2009년 10월 25일 일요일
Helvetica Font

History
Helvetica was developed in 1957 by Max Miedinger with Eduard Hoffmann at the Haas'sche Schriftgiesserei (Haas type foundry) of Münchenstein, Switzerland. Haas set out to design a new sans-serif typeface that could compete with Akzidenz-Grotesk in the Swiss market. Originally called Die Neue Haas Grotesk, it was created based on Schelter-Grotesk. The aim of the new design was to create a neutral typeface that had great clarity, had no intrinsic meaning in its form, and could be used on a wide variety of signage.
When Linotype adopted the Neue Haas Grotesk (which was never planned to be a full range of mechanical and hot-metal typefaces) its design was reworked. After the success of Univers, Arthur Ritzel of Stempel redesigned Neue Haas Grotesk into a larger family.
In 1960, the typeface's name was changed by Haas' German parent company Stempel to Helvetica (derived from Confoederatio Helvetica, the Latin name for Switzerland) in order to make it more marketable internationally.
 Helvetica.zip
2009년 10월 22일 목요일
Dropbox
2009년 10월 21일 수요일
2009년 10월 14일 수요일
Head Tracking for Desktop VR Displays using the Wii Remote
Using the infrared camera in the Wii remote and a head mounted sensor bar (two IR LEDs), you can accurately track the location of your head and render view dependent images on the screen. This effectively transforms your display into a portal to a virtual environment. The display properly reacts to head and body movement as if it were a real window creating a realistic illusion of depth and space.
The program only needs to know your display size and the size of your sensor bar. The software is a custom C# DirectX program and is primarily provided as sample code for developers without support or additional documentation. You may need the most recent version of DirectX installed for this to work.
Software
To run the DesktopVR program you see in the video:
1. Connect your wiimote to your PC via Bluetooth. If you don't know how to do this, you can follow this tutorial. I've been told it works with other Bluetooth drivers, but I have not tested them myself.
2. Download the WiiDesktopVR (v02) sample program. Read the README file on program usage and configuration. Launch the "WiiDesktopVR.exe" in the main folder. A potentially more stable/Vista/64-bit compatible version has been created by Andrea Leganza. There also may be more variants on the web.
NOTE: If you are having trouble with running the program, you can check my project blog post about it or check the forum for assistance. I am unable to replicate these problems, so it hard for me to debug them. But, other people have figured it out. Things that have been identified to help: delete the "config.dat" file and re-run the program, install a new version of Direct X, or istall .NET 2.0.
Developers Notes: The code is built on top of this Wiimote library. To compile the program, you will need a C# IDE and the DirectX SDK. More notes are in the README.
A visit to this project's FAQ and Advanced Discussion post may be very englightening. You may also find the official discussion forums for my wiimote projects helpful: WiimoteProject.com
2009년 10월 13일 화요일
Low-Cost Multi-touch Whiteboard using the Wiimote
Software
The calibration and mouse cursor emulation software is available for you to download and try yourself. Note: My mouse emulation code isn't perfect. If any of you are programmers and can get it working with Alias Sketchbook, drop me a line.
1. Connect your wiimote to your PC via Bluetooth. There are a number of tutorials online on how to do this, possibly even for you specific software/hardware configuration. The Wiimote works with many (but not all) Bluetooth drivers. You can report/read about compatibility issues at WiimoteProject.com
2. Download the Wiimote Whiteboard software to the right. Please read the "READ ME.txt" file first! Make sure your wiimote is connected via Bluetooth, and then run the ".exe" in the main folder. NOTE: Good placement of the wiimote is key to good tracking. View the README for more info.
Multitouch: The multitouch demos are custom C# DirectX programs. You may download the sample program to the right, but this is provided for developers without support or documentation. The code is built on top of this Wiimote library. Unfortunately, multi-touch capable applications are currently extremely rare. Hopefully, that will change as more developers explore its potential.
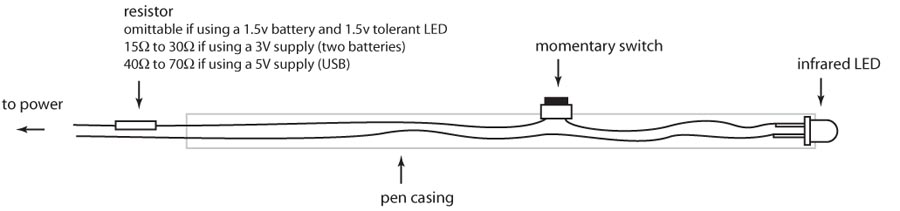
Building pens: Here is a simple schematic of the light pen. The LEDs that I use are Vishay TSAL6400s running at 100mA, but lots of other LEDs will work too. You also might be able to jump start your experimentation by retro-fitting a mini keychain light with an IR LED. I'm currently looking into manufacturing and selling IR pens, but this may take several months.
Mac/Linux Versions: Due to personal time contraints, I probably won't be able to make a port myself. But fairly mature versions are available online. However, I haven't tried them myself. I've also created a Source Forge Project - Wiimote Whiteboard, but it does not seem to be getting much love.
Troika - 'Cloud' - digital sculpture for British Airways
3D LED Cube (三维显示器)
Seekway

Augmented reality

어 놓은것을 말한다고 하는군요. 종잡을 수 없는 어지러운 세계라고 할까요.
최초의 AR Cyber Figure Alice란 컨셉 제품입니다. 제품을 구입하면 사진에서 보는것과 같은 사이
버스틱과 사이버큐브가 제공됩니다. 웹캠이 설치된 곳에 큐브를 놓고 스틱으로 이리 저리 찌르고
쓰다듬어 주는 시늉을 하면, 가상소녀 앨리스가 리액션으로 모니터에 나와서 놀아주고 벗어주고
한다고 하는군요.
Geisha Tokyo Entertainment Inc
Whiteboard Pong
증강현실: Total Immersion Demo 08
Leo Villareal
Villareal "Multiverse" National Gallery of Art, Washington DC from Walter Patrick Smith, AIA LEED-A on Vimeo.
CirculaFloor Robotic VR Movement
World Builder (high quality)

Dyson Air Multiplier™ fans
 |
No blades. No buffeting.
Air Multiplier™ technology amplifies surrounding air, giving an uninterrupted stream of smooth air.

Sticky Light
Sticky Light
[the smart laser scanner revisited]
The piece is based upon a 3d tracking technology developped in our lab in 2003, using a laser diode, a pair of steering mirrors, and a single non-imaging photodetector called the "smart laser scanner" (for details, see here). The hardware is very unique: since there is no camera nor projector (with pixellated sensors or light sources), tracking as well as motion can be extremely smooth and fluid. (The laser power is less than half a milliwatt - half the power of a not very powerful laser pointer - and does not supposes any hazard).
Urbanscreen
증강현실 (AR: Augmented Reality)
2009년 10월 8일 목요일
Hack a day
MS 차세대 마우스
MS는 “윈도7의 멀티터치 기능을 이용하기 위해 매번 모니터에 손을 뻗을 수 없는 노릇”이라며 “터치 마우스를 통해 멀티터치 기능을 좀더 효율적으로 이용할 수 있도록 했다”고 설명했다.